Summertime is here in the United States of America – yeah! Time for backyard BBQs, baseball, juicy watermelon, catching lightning bugs, and donning our patriotic red, white and blue.
Just in time for Fourth of July preparations, is a super simple DIY cut-off blue denim jean shorts tutorial. Follow along.
Materials & Supplies Shopping List
*I used The Children’s Place Baby And Toddler Girls Roll Cuff Denim Shorts, purchased on-sale for less than $7 pre-tax. If you want to make these for boys, start with denim shorts that go to the knee.
**I used Old Navy Printed Full-Length Leggings for Toddler Girls in Americana, purchased on-sale for $6 pre-tax.
Step 1: Distress Jean Shorts
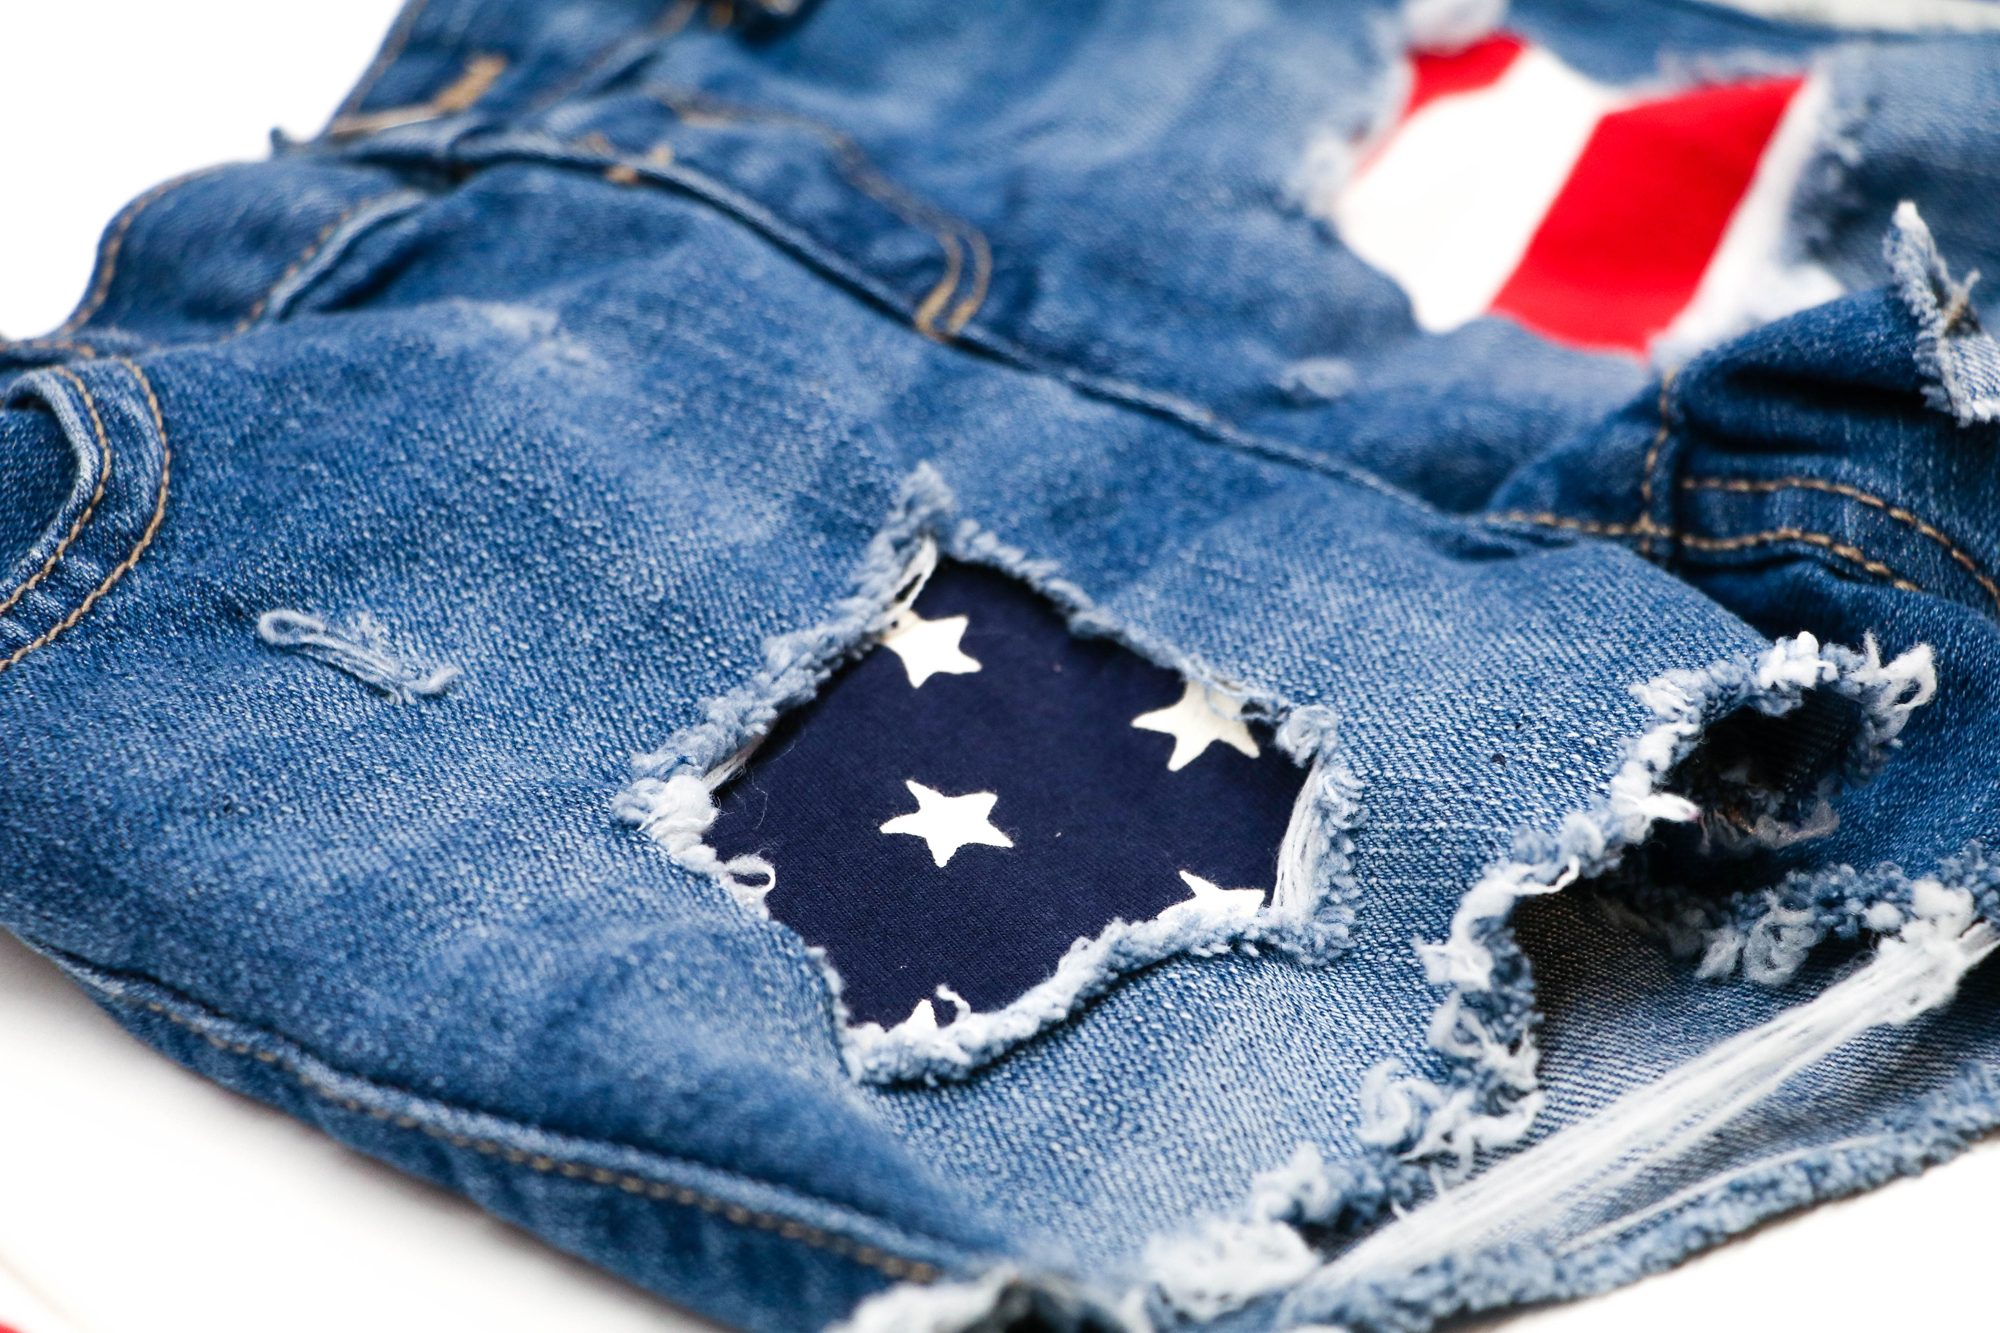
Once you have gathered all of your supplies, your first step is going to be cutting off the bottom edge of the shorts so they are left raw and unfinished. This will help them to fray in the washer and dryer.
Then, using a fabric pencil, trace out any areas you want to cut out to expose the fabric from underneath. In my example, I cut out two larger areas and then use the edge of the scissors to distress a couple of other areas on the front of the shorts. One of the larger areas, I made more of a rectangle shape, the other a little more imperfect.
Next, I ran the shorts through the washer and dryer, in my next three loads. This helped all of the raw edges to fray, giving them that distressed look. I also ran the leggings through the washer and dryer once, as you should all children’s clothing before its worn.


Step 2: Cut Out Flag Fabric
You’ll want to cut your flag fabric to match not only the size of any larger holes, but also smaller areas too. This way, if they continue to fray, undergarments won’t be on display.
Flip the jean shorts inside out, so you can assess the distressed areas from within.
Cut the flag fabric along the seams to separate the red & white stripes from the blue & white star pattern.
Lay the material over the distressed areas, upside down (so it will be front-side showing through) to determine where to make your cuts. Note that the material, if stretchy fabric like the one I used, may roll a bit on the sides as you make your cuts. The red & white stripes should go on the left of the inside and the blue & white stars to the right (so when its turned right-side out it will be in the order of an American flag).


Step 3: Glue Down Flag Fabric
Use Unique Stitch fabric glue applied anywhere the two fabrics meet. Making sure to go around the circumference of any distressed areas. The red & white stripes should be applied horizontally. I added fabric pins for the first half of the 30-minute drying time to ensure the materials stay flat and attached together. I didn’t want the pins gluing into place, hence the removal at the 15-minute mark. Metal hair clips would also do the trick.
Once I removed the pins, I attempted to roll up the flag fabric to find any corners or edges that were not fully glued down and added additional glue to these areas. You want to take the glue to the edge of the flag fabric, to prevent any kind of roll the material will have once the project is complete.
After the drying time was up for the glue, I turned the shorts back to right-side out. And, then came in from the front, under the distressed areas, to add additional glue to seam these pieces together. Note, if you want additional fray to continue to take place, don’t go too close to the edge here from the front side.
Once another thirty minutes had passed, the project was complete!


As the Unique Stitch directions will inform you, do not wash again until a full 24-hours has passed from bonding the materials together.

Should you follow my tutorial, I want to see your finished work! Tag me on social media using @savingamyblog or #savingamyblog. Thank you in advance for sharing!
Saving Amy is a participant in the Amazon Services LLC Associates Program, an affiliate advertising program designed to provide a means for sites to earn advertising fees by advertising and linking to amazon.com.
Social Follow and Share
NEW! On the Blog: A super easy, super sweet DIY guide to make American flag, cut-off, denim shorts ahead of the upcoming Fourth of July holiday! https://t.co/yt4FenUX9q #savingamyblog #diy #kidsapparel #4thofjuly
— Saving Amy (@savingamyblog) June 15, 2019