At What Point Do You Become IKEA Hack Pros?
We’ve now knocked out hacks for the 1) DUKTIG children’s play kitchen, 2) created one-of-a-kind transforming home office desks (utilizing several different IKEA products), 3) added casters to the GULLIVER crib, 4) made a dog kennel cover from the INGO pine table and 5) converted the larger of two LACK nesting tables into a LEGO® play table. And, if “professional” means selling something – why yes, we have sold one of these already! So, perhaps that does make us pros!
This last one in the list, we just wrapped up at the beginning of this year with every intention to continue forward in hacking the smaller of the two LACK nesting tables. The vision this time: an ice cream vendor cart. But wait! It turned into more!
Let’s start with our supplies list:
Shopping List
IKEA

We started with the IKEA LACK set-of-2 nesting tables (in gray), a combined price of $29.99, but only used the smaller of the two tables for this project. (The larger one was used for our earlier LEGO® play table project). The rest of our shopping list included:
- One 16.5″ x 11.75″ x 4″ IKEA TROFAST storage boxes (come in white, yellow, or green – we selected yellow; $3 ea.)
- One set-of-2 (2 total) IKEA BAGGANÄS stainless steel handles (also come in black or brass color; $10.99 per set)
- Two yards of IKEA SOFIA fabric in classic white/gray stripes (also comes in white/black and white/yellow; $7.99/yard)
The IKEA items, before sales tax, $39.97 (this is assuming one-third the cost of the LACK tables, since we only used the smaller one).


Lowe’s Home Improvement
- Four 1-5/8″ Roller Casters (Item #66942 Model #4265599; $5.58 ea.)
- Four 7/8″ x 48″ Round Wood Poplar Dowel Rods (Item #19385 Model #430911; $3.78 ea.) – look down these to ensure they are the straightest available ones before purchasing
- One 1″ x 2″ x 8′ Select Pine Board (Item #1206 Model #83706; $4.96)
- One 1/2″ x 3/4″ x 8′ Pine Stop (Item #3487 Model #EC254; $6.96)
- Four packages (2 ct. ea.) Hillman #12 x 3-in Silver Zinc-Plated Flat Wood Screws (Item #57251 Model #490033; $1.28 ea.)
- One package (10 ct.) Hillman #8 x 1-in Zinc-Plated Hanger Bolt (Item #124015 Model #491409; $1.28)
- One package (6 ct.) 1/2″ Hillman Steel Cup Hook (Item #58433 Model #490944; $1.28)
- One Krylon Colormaxx General Purpose Spray Paint in matte deep gray (Item #1026759 Model #K05550007; $3.98) – or if you get the black/white LACK tables, get black to match
- Elmer’s Wood Glue (Item #41148 Model #E700; $1.98)
- One box (75 ct.) Particle Board 3/4″ (number 6) Phillips Yellow Dichromate screws (approximately $9.49) – on Amazon
The Lowe’s items, before sales tax, $72.49.


Joann Fabric and Craft Stores
- One yard Glitterbug Solid Crushed Panne fabric in red ($6.99/yard)
- Half yard Glitterbug Solid Crushed Panne fabric in black ($6.99/yard)
- Two yards Muslin fabric in white ($2.99/yard) – used to line the IKEA fabric
- One spool of Offray Grosgrain Ribbon 3/8″ x 21′, silver ($2.99)
- Two Ss 27in Daffodil Chair Tie ($8.99 ea.)
- Five packs VELCRO Brand 0.75”x24” Fabric Fusion Heat-Activated Adhesive (three beige; Item #8585440; two black; Item #8432684; $7.99 ea.)
- One package Dritz 1/4″ 2-Part Eyelet Kit in matte gold ($5.99)
- One package Dritz Fray Check Sealant ($5.99)
The Joann items, before discounts and coupons, sales tax, $89.37. Items are often on sale or you can apply 40% off to a single non-sale item per transaction. Exclusions apply. Download the Joann mobile app.

Michaels Stores
- Four ArtMinds Wooden 1.75″ Doll Heads ($4.49 ea.) – the finials at Lowe’s were either too big or too small; these “doll heads,” with pre-drilled pilot holes, worked just perfect
The Michaels items, before discounts and coupons, sales tax, $17.96. Items are often on sale or you can apply 40% off to a single non-sale item per transaction. Exclusions apply. Download the Michaels mobile app.

Optional Accessories
- Target Dollar Spot Pretend Play Ice Cream Shoppe Set by Horizon Group (1 apron, 1 hat; Item: #93221; $5 ea.)
- Melissa & Doug Wooden Scoop & Serve Ice Cream Counter ($49.99)
- Melissa & Doug assorted puppets ($15.47+)
- IKEA assorted puppets ($4.99+)
- IKEA DUKTIG toy cash register ($17.99)
- IKEA DUKTIG assorted play food (14-piece vegetables set: $9.99; 9-piece fruit basket set: $9.99)
- IKEA SOCKERÄRT white pitcher ($9.99)
- IKEA SMYCKA artificial flower, ranunculus, white ($2.99 ea.)
- Children’s Apron ($13.99)
- Girls Sun Hat ($14.99+)
- Black Desk Clip-On Light(s) (Varies) – if you want to illuminate the puppets, you may want to consider a clip-on light or two that can hang over the puppets, attached to the canopy frame


Total Project Cost
All essential materials, before tax (and any store discounts applied at checkout), totaled: $219.79.
Tools on Hand
You will also need to have on hand, or borrow (from a friend, neighbor, or local tool library):
- Standard tape measure
- Leveler
- Pencil
- Drop cloth for spray painting
- P220 Sandpaper (Such as 3M SandBlaster)
- IRWIN Marples 7/8-in Woodboring Forstner Drill Bit (Lowe’s: Item #775985 Model #1966899; $11.48)
- Cordless Drill with a 1/8″ drill bit (always go approximately one diameter size down for your drill bit than what your current project screws are)
- Miter saw
- Hammer
- Block of 4″x4″ wood – used during eyelet install in canopy, for counter pressure when hammering
- Xacto Basic Knife Set” target=”_blank” rel=”noopener noreferrer”>Xacto Basic Knife Set
Multi-Purpose Children’s Role Play Table
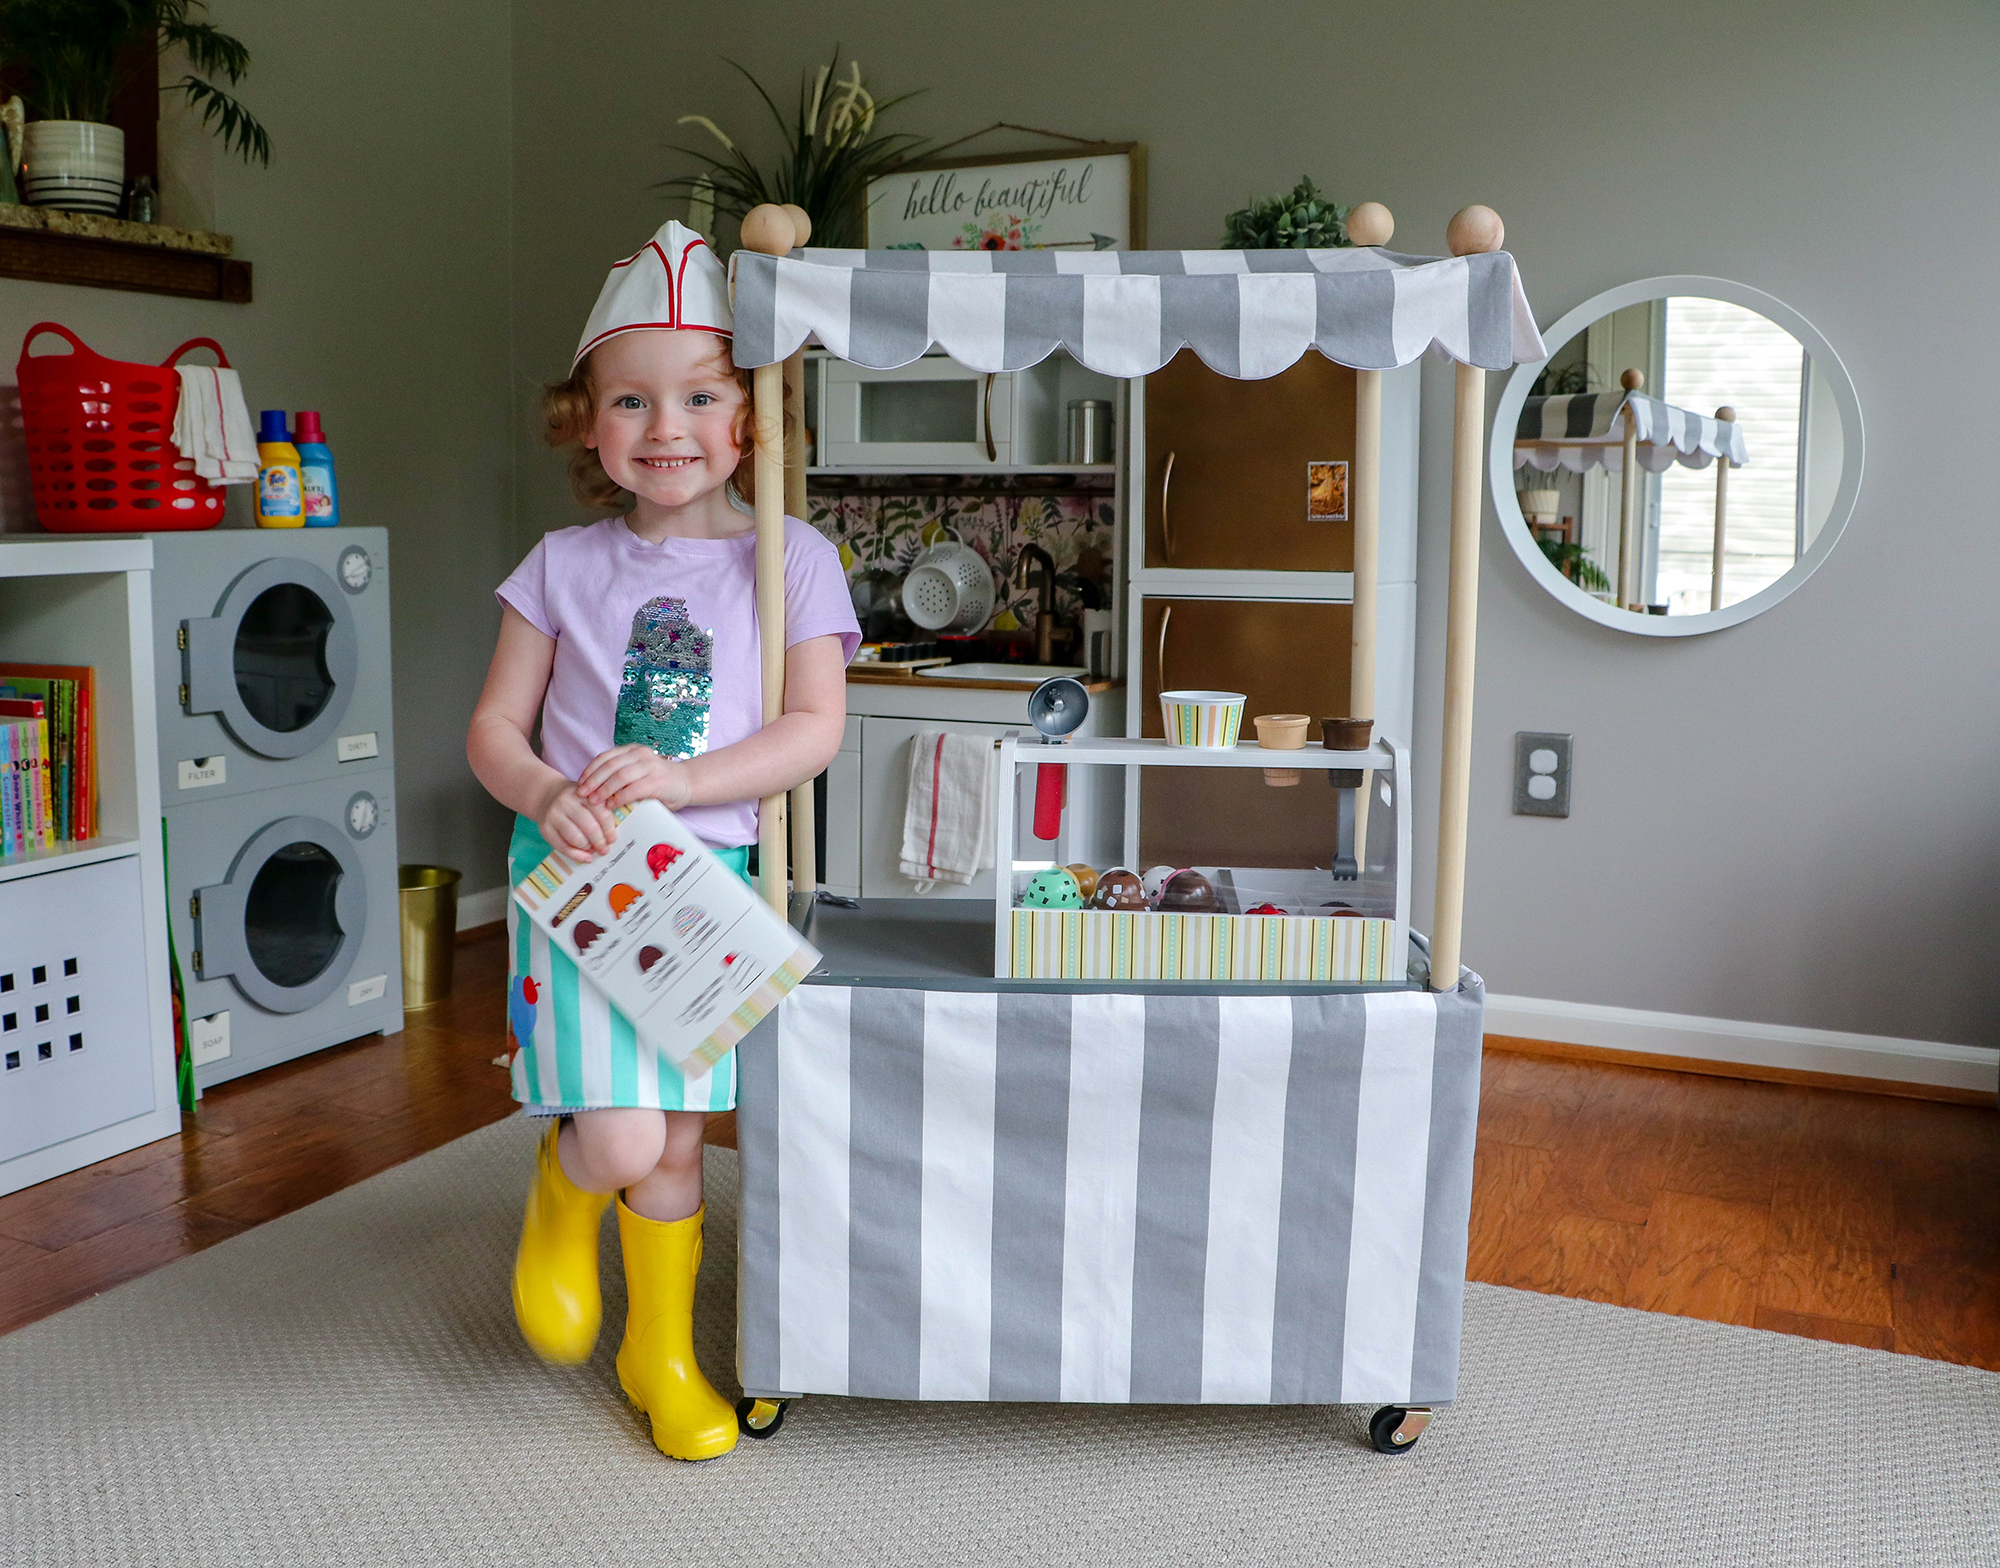
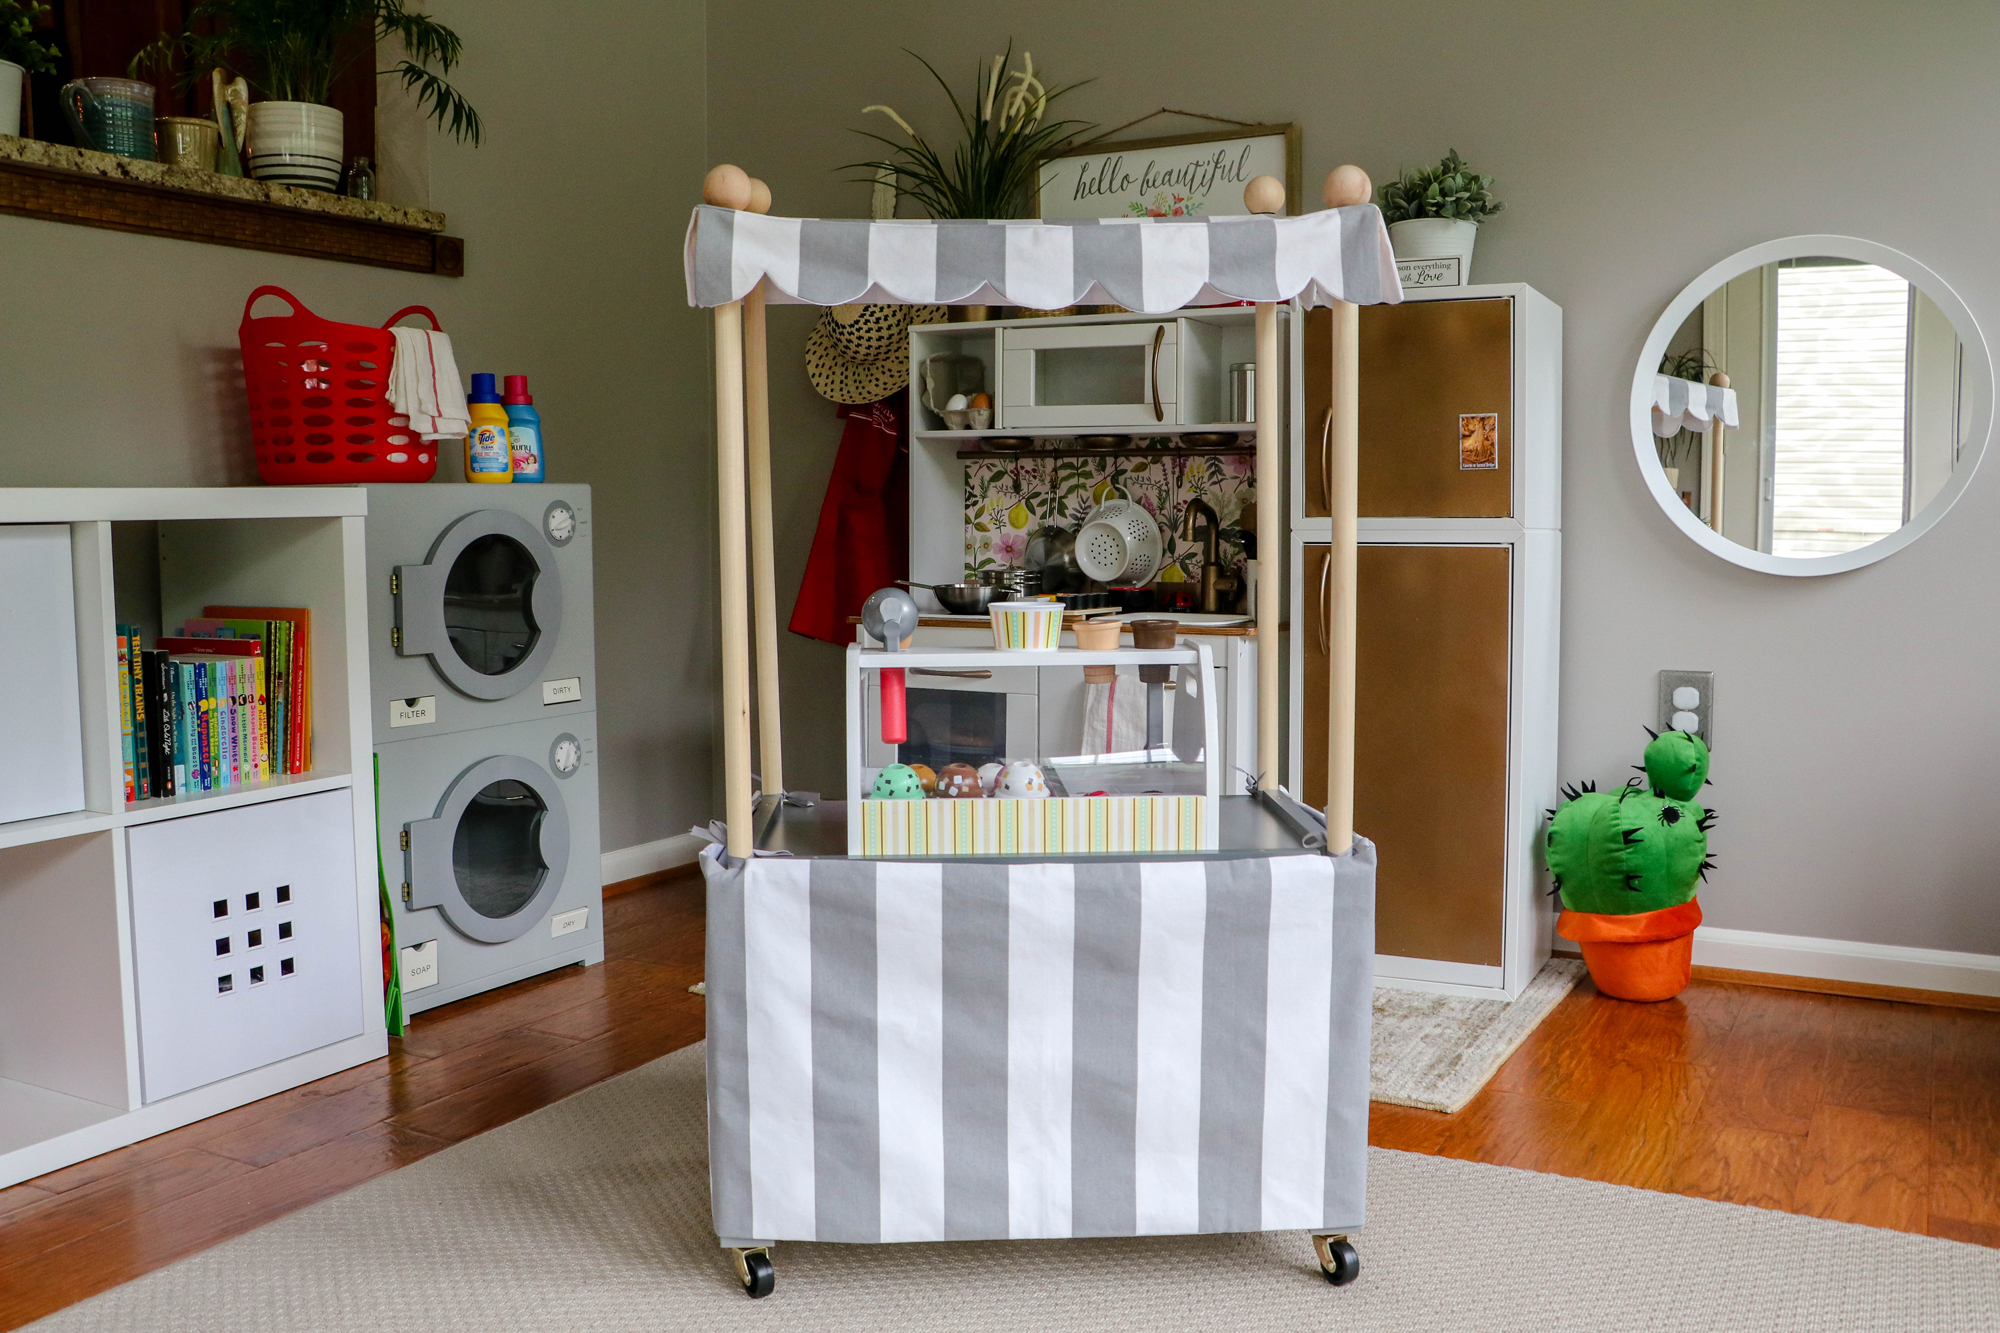
Our daughter had already previously been gifted the Melissa & Doug Wooden Scoop & Serve Ice Cream Counter, so when we ended up with a smaller IKEA LACK table left over from the larger IKEA LACK table hack earlier in the year, we dreamed up an ice cream vendor cart. But, as we got going, the goals evolved and the end result was to make this into:
- Any-kind of children’s role play vendor cart (on wheels)
- And, a puppet theater

Step-by-Step Process
Woodworking & Power Tools

First, we attached the roller casters to each of the four legs of the assembled LACK table using pilot holes and 3/4″ (number 6) particle board screws.


Second, we needed to determine the finished height of the dowel rods. We knew we didn’t want the entire height of this (with casters attached) to be any taller than the already-hacked DUKTIG children’s play kitchen it would sit near. But we also wanted our eldest to get some use out of this new hack before she outgrew it and it moved on to the younger siblings. That lead us to a front dowel rod height of 23″ and a back dowel rod height of 25″ to give the canopy a slight 2″ tilt downward, as if casting away the rain.
We cut the dowel rods at 23.5″ and 25.5″ respectively, to allow for 1/2″ of each to be glued within the table surface.


Next, we unscrewed the legs from the table, and set them temporarily to the side, to drill pilot holes from the underside of the table directly through where the leg screw holes were and up through the surface of the table. This would allow us to line up the woodboring drill bit in the exact right spot on all four corners for the dowel rods to support the canopy.


We went 1/2″ deep with the woodboring drill bit on each of the top four corners. Coincidentally our woodboring bit had a depth of 1/2″, so that made gauging the depth very easy.


Once the 7/8″-wide holes were created 1/2″ deep with the woodboring drill bit, on each of the four surface corners, we did a test run of the dowel rods to ensure they fit to the right height. After the test run, we applied wood glue to the underside of each dowel rod and placed it into the drilled hole.
We used both a leveler and also a permanent frame structure (made of 1/2″ x 3/4″ x 8′ pine stop) at the top to ensure the dowels were set as straight as could be. This frame would also later double for our puppet theater curtain rods.
Each piece of the permanent frame structure was horizontally leveled, instead of installing at a tilt (as the dowel rods were). This would make the sewing portion of the project go a little easier later on. In order to ensure that the frame would be hidden under the finished canopy, we installed the left and right side pieces first, taking them to the height of the front dowel rods. This meant that the back of the side-frame pieces would be at a top-height 2″ deficit from the back dowel rod tops (and we didn’t want them any lower than this). Once those were installed, we installed the front frame piece abutted to the two side pieces and just underneath them. You will see a photo of the framing in the next section, last photo. We later added a rear piece to the frame to allow for back, black curtain panels to hang and hide the puppeteer. This piece we sat abut and on top of the two side frame pieces. We also decided on square-edged boards, instead of additional dowel rods, for the framing to make it much easier to place the and 3/4″ (number 6) particle board screws.


With the dowel rods securely in place, we then added gray-spray-painted 1/2″ x 3/4″ pieces, cut to size, to the surface on the front, left, and right sides of the cart to keep items from sliding off the tabletop when the cart was being pushed around. Each piece was placed exactly between the dowel rods and secured with 3/4″ (number 6) particle board screws. It’s our later goal to attach a bar to one or both the left and right sides for pushing, pulling, and hanging hand towels, which means the table may be lifted up with a slight tilt when in motion.


Sewing
After completion of the canopy frame and surface rails, next up it was time to measure out all finished fabric pieces. This included:
- Cart/Theater: A 3-sided skirt
- Cart/Theater: The canopy with scalloped edges on 3-sides
- Theater: Two side, red curtain panels (one for left, one for right)
- Theater: Two front, red curtain panels
- Theater: Two back, black curtain panels
The skirt and all of the curtain panels were rectangular in nature. All six of the curtain panels simply needed a closed, simple hemmed edge, and a straight stitch was used on the sewing machine to lock the polyester crushed panne edge in place. The skirt got lined with muslin during the sewing process, at the same time that ribbon was placed at the exact location of the four dowel rods, to tie the skirt on.
When creating the curtains, we multiplied 1.5 x the exact width measurement, to give the curtains a ripple effect. The two side curtain exact width measurement was 12.5″ so we created a finished curtain at 18″ wide. The front two panels, 10.25″ each exact width, so 15″ width was the finished product. All of these at 25″ height, which included extra material to wrap the frame at the top. The back curtains were near identical measurements to the front two curtains, except an extra 2″ to compensate for the height of the frame piece, for a total height of 27″. All of these finished included a 1/2″ inch turned-up-one-time simple hem on the edges.
The skirt ended up measuring 53.5″ wide by 14″ tall.
And, finally the canopy, we measured to the exact corners of the frame to give the canopy a nice drop at the sharpest edge. Coincidentally, with the 1/2″ wide frame attached to the top of the table, it brought the entire top of the cart nearly identically in-line with the table top (because the dowel rods are slightly recessed into the table). The rectangular portion of the canopy measured at 18.75″ (including 3″ rear overhang) x 23.5″, with 1/2″ seam allowance, the fabric was cut to 19.75″ x 24.5″.


The canopy was a little more complicated. Not only would it be the only piece of finished fabric that would need to compensate for the tilt, it would have three scalloped-edge sides and a finished, short backside too. It would also be muslin-lined, similar to the skirt. In order to not have to line up button holes exactly with the dowel rods and focus on making a cohesive finished canopy, it was thought that eyelets could make for the needed pass-throughs for the finial screws.
We decided on a scalloped edge that would drop 3.5″ to allow for elder young children to get as much use as possible out of the cart before outgrowing its use at eye-level. A perfectly round kitchen item was used to make a pattern for the scalloped edges. We decided not to make the scallops as tight as the stripes intentionally. But of course, you could decide this differently in your specific hack too. The shallower measurement of the scalloping fell around 2.25″.


Canopy Assembly
After the canopy sewing process was complete, it was time to attach it to the frame of the cart. First up, we had to find the center point of each dowel rod, which is circular, to drill a pilot hole for the hanger bolts (double-ended screws with no head). We used this quick reference guide from Instructables for locating the center point.


Once each dowel rod had a dead-center pilot hole in place, we held the canopy, stretched tightly over the four dowel rods (definitely need 2+ adults for this). Feeling through the fabric with our finger, we located each pilot hole and noted it with a pencil mark on the top side of the fabric. This is where each eyelet would be placed to form a sturdy pass-through for the finial hanger bolts. First, we marked the front two spots, installed the eyelets (and hanger bolts, see next section), then the back two later. This allowed us to check our work as we went. We used an eyelet kit purchased at Joann.


With each of the four corners of the canopy now having an eyelet in place, we screwed one end of each hanger bolt into each dowel rod using a battery-powered drill and then placed the fabric on top. We manually screwed the finials (i.e., doll heads) into place, which already had pilot holes on the undersides.


Temporary, When-in-Use-As-a-Theater, Curtains Assembly
As previously mentioned, the six curtain panels simply needed a closed, simple hemmed edge, and a straight stitch was used on the sewing machine to lock the polyester crushed panne edge in place. Once this was complete, we needed a way to temporarily attach them to the frame hidden underneath the canopy, but only when the cart was to be converted to a puppet theater. Iron-on Velcro was a solution that came to mind.
The first strip of Velcro was ironed onto the panne around 4″ to 4.25″ from the top. This would allow for the top of the curtain to wrap the frame snugly. And the opposing piece was ironed onto the fabric at the top-most edge. Iron-on instructions with the Velcro were followed precisely, including a press cloth between the iron on it’s highest setting and the polyester material, for 90 seconds.
These curtains are stored with Velcro closed, in a gallon-sized freezer bag, out of reach of the children. Velcro sticks to every fabric and the kids don’t quite get this yet.
In order to keep the curtains pulled back on the front of the stage, we finished this look off with chair ties, knotted and attached to a small cup hook on the back of the front two dowel rods (about halfway up each rod).


Drawer Assembly
There was no real reason this part was done last instead of the very first step of all, other than the fact it was an after-thought for this project. Just another place to stash stuff when the cart or theater is in use.
For a complete walk-through of drawer assembly, see IKEA Hack: LACK table conversion into a LEGO® play table.
This is also where the #12 x 3-in Silver Zinc-Plated Flat Wood Screws came into play. Once pilot holes were drilled into the boards that would support the drawer pulls, it was attached straight into the underside of the table. Not only did the screw need to pass through the 2″ of the pine board and also 1″ into the bottom of the table.
Note that this was a tight fit and the finishing rings on the drawer pulls were left off intentionally to buy just enough space for both the drawer pulls and the drawer itself to fit with free forward-and-backward movement.
Also, the other thing we did different this time, over the LEGO table hack was installing a small 4″ wide stopper (using the 1″ x 2″ select pine board) to keep the kids from continuously pushing the drawer into the skirt on the front side of the table.


The Finished Vendor Cart Hack
Mind you, we may install small handles to the left and/or right sides of the cart, to make it easier to pull around, but we haven’t quite yet found the right part that would be easy to attach through the skirt, from the outside. They would double as hand towel holders for the vendor cart. And, if/when that happens, I’ll make sure to update with a picture or two here. Otherwise, this project is complete!
And now, it was time to play…


Social Follow and Share
Hot off the presses on the blog! Our 6th DIY IKEA Hack. Converted a $10 LACK table into a 2-in-1 children’s role play vendor cart & puppet theater. ❤️ https://t.co/FZBWoduFwo #ikeahack #ikeahacking #ikealack #savingamyblog #ontheblog #diy pic.twitter.com/xuxQ15DwYM
— Saving Amy (@savingamyblog) May 12, 2019
Saving Amy is a participant in the Amazon Services LLC Associates Program, an affiliate advertising program designed to provide a means for sites to earn advertising fees by advertising and linking to amazon.com.
The Saving Amy blog web site is in no way related to and/or endorsed by IKEA®, IKEA.com OR The IKEA Group. All IKEA product links are provided for reader convenience and do not imply IKEA’s approval of this blog web site nor the modification of its products. IKEA and Saving Amy are not liable for any product failure, injury, or damage resulting from modifications to IKEA product assembly and use.