
Well, that’s quite the blog post title…isn’t it? But, it’s true.
Our Fifth IKEA Hack
We’ve now knocked out hacks for the 1) DUKTIG children’s play kitchen, 2) created one-of-a-kind transforming home office desks (utilizing several different IKEA products), 3) added casters to the GULLIVER crib, and 4) made a dog kennel cover from the INGO pine table. It was high time that we returned to our IKEA hacking ways. And, for our fifth go, it was a project for the kids (or “kid in all of us” I should say).
This hack was likely our second easiest, behind the crib on casters, you just need to have the right tools and supplies. So, let’s review what you’ll need to kick off the project.

Shopping List
IKEA

We started with the IKEA LACK set-of-2 nesting tables (in gray), a combined price of $29.99, but only used the larger of the two tables for this project. The smaller IKEA LACK table was recently converted into a 2-in-1 children’s role play vendor cart and puppet theater. The rest of our shopping list included:
- Two IKEA VESSLA storage crates with casters (come in white, pink, or blue – we selected white; $6.49 ea.)
- Two IKEA VESSLA lids (we selected white; $2 ea.)
- Two 16.5″ x 11.75″ x 4″ IKEA TROFAST storage boxes (come in white, yellow, or green – we selected green; $3 ea.)
- Two IKEA UTTER children’s stools (come in white, pink, or green – we selected white; $4.99 ea.)
- Two sets-of-2 (4 total) IKEA BAGGANÄS stainless steel handles (also come in black or brass color; $10.99 per set)
The IKEA items, before sales tax, $74.94 (this is assuming two-thirds the cost of the LACK tables, since we only used the larger one).


Lowe’s Home Improvement
- One .5″ thick x 2′ x 4′ Blondewood from Lowe’s Home Improvement (Item #907224 Model #907224; $16.98) – product not available at Lowes.com
- Two 0.375″ x 1.125″ x 7′ Crystal White Prefinished Polystyrene 9888 Stop Trim (Item #19822 Model #98880700032; $3.97 ea.) – if you believe the table may take heavy abuse, I recommend considering wood for your edge trim instead
- One 1″ x 2″ x 8′ Select Pine Board (Item #1206 Model #83706; $4.96)
- Two .75″ Whistle Knobs in chrome (Item #300524 Model #PN2814V-PC-C; $3.77 ea.)
- Four packages (2 ct. ea.) Hillman #12 x 3-in Silver Zinc-Plated Flat Wood Screws (Item #57251 Model #490033; $1.28 ea.)
- Four National Hardware 1-4/57-in Steel Zinc-Plated Corner Braces (Item #809446 Model #N227-389; $1.98 ea.)
- One package (10 ct.) Hillman #8 x 1-in Zinc-Plated Hanger Bolt (Item #124015 Model #491409; $1.28)
- Two 10-oz. Liquid Nails Projects Construction Adhesive (Item #160329 Model #LN-704; $1.78 ea.)
- One 10.1-oz. Dynaflex 230 Latex Caulk Sealant in gray (Item #553863 Model #11286; $4.78) – or if you get the black/white LACK tables, get clear to match
- One Krylon Colormaxx General Purpose Spray Paint in matte deep gray (Item #1026759 Model #K05550007; $3.98) – or if you get the black/white LACK tables, get black to match
The Lowe’s items, before sales tax, $64.06. You get two complimentary cuts on-site at Lowe’s too, so we took advantage so we didn’t have to get the table saw out at home.


LEGO
- Three 15″ x 15″ DUPLO Green Baseplates ($11.99 ea., on sale at the time of this post)
- Three 15″ x 15″ LEGO Classic Gray Baseplates ($9.99 ea., on sale at the time of this post)
The LEGO items, not including the set of Mega Bloks, DUPLO we already had as birthday gifts, nor sales tax, $65.94.

Total Project Cost
All materials, before tax, totaled: $204.94.
Tools on Hand
You will also need to have on hand, or borrow (from a friend, neighbor, or local tool library):
- Standard tape measure
- Pencil
- Drop cloth for spray painting
- P220 Sandpaper (Such as 3M SandBlaster)
- 7/8″ Bi-metal Arbored Hole Saw (Lowe’s: Item #348125 Model #1772429; $10.48)
- Cordless Drill with a 1/8″ drill bit (always go approximately one diameter size down for your drill bit than what your current project screws are)
- One-Handed Mini Bar Clamp 4 Pack, 6″ (Such as the IRWIN Quick-Grip 1964758)
- Caulk Gun (Such as the Newborn Pro Super Ratchet Rod Caulk Gun with Gator Trigger Comfort Grip)
- Miter Saw (Such as the DEWALT DW715 15-Amp 12-Inch Single-Bevel Compound Miter Saw)
- Air Compressor & Brad Nailer (Such as the BOSTITCH BTFP3KIT 3-Tool Portable Air Compressor Combo Kit)
- 18 Gauge, 1-1/4-Inch Brad Nails (Such as the DEWALT DBN18125 Heavy Duty Brad Nails)
Three-in-One, Multi-Purpose Table
The end goal with this project was to have the table grow with the kids. So, in the end, the LACK table would serve three purposes:
- It could still be used in its near original state as a regular table
- It could be used with DUPLO® blocks and Fisher-Price® Mega Bloks®
- It could be used with LEGO® Classic blocks too

Step-by-Step Process
This table, start to finish, took about a month of spare time of two full-time working adults with two kids three and under. Living in Central Maryland, our sun sets around 5pm in the wintertime – we worked on it December – January. So, please note that occasionally we made progress in the evenings, in between the weekends, and hence the photos being of different light quality. I hope you are still able to see quite nicely the details of what we did. Thank you for your understanding!
The absolute first thing we did, was lay the blondewood board onto the LACK table surface to make sure they matched up exactly. As I had informed the Lowe’s associate who did our two free cuts in-store, it was ok to be “generous” with the wood in the cutting process and not under cut. They can’t quite guarantee exact-exact cuts. Generous would still give us the ability to add the edge trim all the way around the board with no gapping. If the board was under cut, the trim would have to be spaced out from the board a little bit to compensate for fitting around the LACK table underneath. Good news – it was a perfect fit! We let our three-year-old have at it with a pencil on the board for a bit, because eventually the whole thing would be covered over with LEGO baseplates and paint.

Before moving forward with assembling the table top, however, we wanted to address the under table storage. The more wood cuts we could make early, the more we could group items to paint simultaneously. We ended up cutting the 1″ x 2″ x 8′ Select Pine Board into four equal 15″ length boards, slightly recessed from the 15.75″ deep table. Before spray painting, we next marked the boards with where we needed to drill pilot holes for screws to attach to the underside of the table. We also drilled pilot holes to match the later placement of the IKEA BAGGANÄS stainless steel handles drawer pulls, which we would be using as our plastic drawer gliders.


We also used the 7/8″ hole saw to make a hole on opposing sides of the blondewood that a) fell outside the area where the LEGO baseplates would be glued and b) not terribly close to the edge of the blondewood. It was a balancing act. These holes would later “hold” the tabletop in place on the Lowe’s-purchased whistle knobs that would be attached to the IKEA LACK table surface.
To encourage a smoother cut with the hole saw, we drilled part-way through one side of the board before flipping it over to drill the remaining way through from the other side.


Next, it was time to spray paint both the four 1″ x 2″ boards and the precut blondewood table surface. We focused the paint on the blondewood in areas where the LEGO baseplates would not be glued. A light sanding before the first coat and in between coats allowed for a finished smooth surface.


After coating the spray painted surface twice, and allowing ample time to dry, we attached the drawer pulls to the four 1″ x 2″ boards and then the boards to the underside of the LACK table.
You’ll see in the photos that we set one of the 1″ x 2″ boards along with the plastic IKEA TROFAST drawer in place to double-check there was ample clearance for the drawers to glide okay.
Then, lining up the 1″ x 2″ center positioned, we drilled pilot holes into the underside of the table surface to accept the screws we would next drill through. These holes were not located in the same space the screws drilled in to hold the drawer pulls in place. Offset them slightly.
From the inside of one paired 1″ x 2″ to another, it was approximately 18″. The drawer is slightly under 16.5″, which worked well with the drawer pulls serving as glides. Be sure not to install these 1″ x 2″ boards so close together the drawer won’t glide.
After the four 1″ x 2″ boards were attached with two screws each, we felt as if they needed an additional strength support against the kids wear-and-tear. We had some corner braces already on hand, that we used one per board.


Once the blondewood board was dry from its two coats of spray paint, light sanding in between, we brought it inside to see where the DUPLO baseplates would line up. It was important that we put a few DUPLO pieces in between these three separate baseplates to see if they needed to abut one another or be spaced. It turns out they did need a minor gap between them! No big deal. Except for the fact we hadn’t spray painted the entire board, just the edges. So back to the garage it went for spray paint application in the middle, where the three baseplates would meet.
After the paint was dry for a second time, we lightly sanded the LEGO baseplates and the board with P220 sandpaper and then applied Liquid Nails construction adhesive to the backside of the baseplates. Making sure to keep the DUPLO pieces in place on the top side, for proper spacing, we flipped the baseplates onto the blondewood board. We had already marked the board with light pencil guides for where the corners of the baseplates would match up.
We then found anything and everything heavy (i.e., lots and lots of books) and placed it on top to put pressure during drying time. When I got down at eye level, I was noticing a minor gap between the baseplates and the board, so we stacked on yet more heavy items – including the dog food bin! We let that sit for a couple of hours to ensure proper adhesion.
After the DUPLO side was done, we repeated this process with the LEGO Classic baseplates on the opposing side of the board.


We decided to use Crystal White Prefinished Polystyrene Stop Trim to edge the blondewood board with trim. After measuring each of the four sides, we used a miter saw to cut the ends of the trim at 45° to join in the middle of the corners. This takes some trial and error to get used to – so remember to measure twice and cut once! It’s always easier to undercut and continue to shave off than to correct an overcut.
Once the four pieces were cut to size, we used the gray spray paint, used on the blondewood board and the 1″ x 2″ boards under the table, to match the trim.
After ample drying time, we attached the trim to the blondewood board using the same Liquid Nails adhesive, temporary clamps on the corners during the drying process, as well as a brad nailer and compressor to secure the trim in place. For each trim piece, we would match it up to the blondewood board vertically and mark the inside of the trim corner with pencil so that we would know exactly where to attach it once the adhesive had been applied. This ensured equal overage of the trim to keep LEGO pieces from easily falling overboard near the edge of the table. It doubled as a second way to make sure when we would flip the table surface over that it would sit on the LACK table top and not slide off.


Finally, it was time for the next to last step – the last step being testing the table out with some play time! We needed to attach the whistle knobs to the two spots on the LACK table top that corresponded to the 7/8″ holes cut out of the blondewood board. This would keep the table top in place each time it was flipped over.
To do this, we used hanger bolts. One end would attach to the inside of the whistle knob, one end would be screwed into the table. We attached the whistle knobs to the hanger bolts first. Then we used our hands to screw the whistle knobs and corresponding hanger bolts into pilot holes in the LACK table top.
So, yeah, this one item is semi-permanent on the table top surface. But, they shouldn’t get in the way of using the table without the LEGO board on top, for coloring, dining, etc. We used a bit of caulk sealant on the underside of the whistle knobs to help keep them in place without making them permanent-permanent.


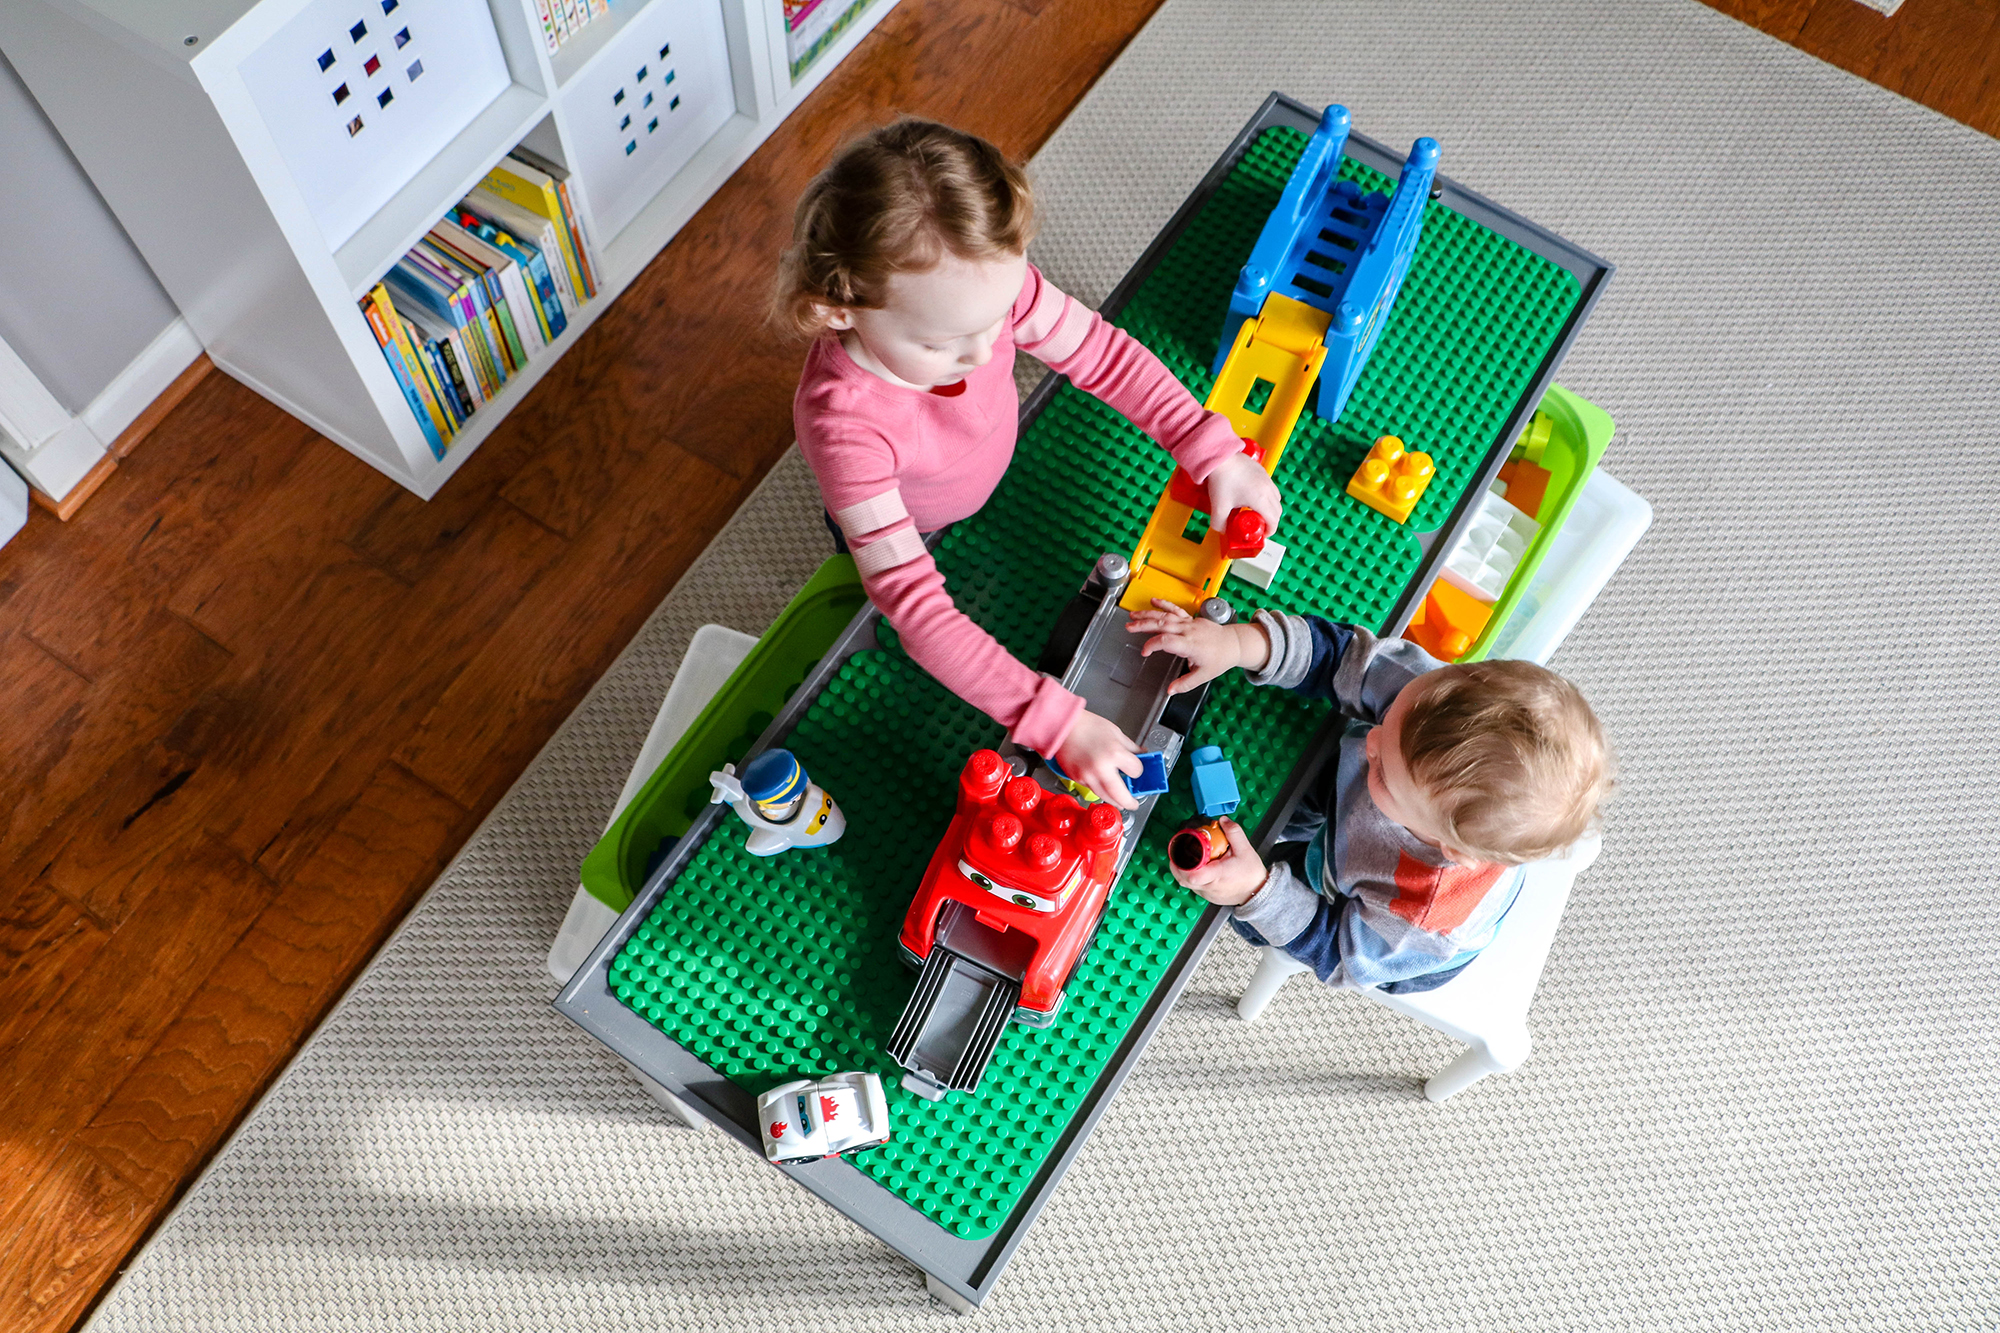
Following are some photos of the hack completed. You’ll see both sides of the table topper, the drawers, and how the storage and stools fit snugly underneath.


And now, it was time to play…


Update 10/15/19: Now that the kids have been playing with this for almost a full year, we discovered that this long-table, versus a more traditional, square, LEGO table, has an added advantage. Because it’s long, the kids can play from opposite sides / ends, without getting in each other’s way and fighting. Thought that little tip might be worth sharing to those of you determining which table to start with for your own hack.
Perhaps the best part of this IKEA LACK hacked table is that nothing on the surface is attached permanently – so we can continue to make other table toppers for it too. We’ve already got our next one in the works – stay tuned! (Will link here when it’s ready)!
Social Follow and Share
In my fifth IKEA hack, the DH and I transform the larger of a set-of-2 nesting tables from the LACK line into a slimline, self-contained, transforming DUPLO / LEGO kids play table. Everything you need to know so you can make it too: https://t.co/5uYolWuC6G #legotable #ikeahack
— Saving Amy (@savingamyblog) March 3, 2019
Saving Amy is a participant in the Amazon Services LLC Associates Program, an affiliate advertising program designed to provide a means for sites to earn advertising fees by advertising and linking to amazon.com.
The Saving Amy blog web site is in no way related to and/or endorsed by IKEA®, IKEA.com OR The IKEA Group. All IKEA product links are provided for reader convenience and do not imply IKEA’s approval of this blog web site nor the modification of its products. IKEA and Saving Amy are not liable for any product failure, injury, or damage resulting from modifications to IKEA product assembly and use.