
In this eight-post blog series, I’ll review the step-by-step details on how my husband and I transformed our master bedroom, walk-in closet, and bathroom – all do-it-yourself and with budget-conscious decisions, materials. Follow along from the beginning of our journey to the project completion for inspiration, encouragement, and knowledge that you can put to use.
In the last post, Part 1, we reviewed DIY Painting Walls. Here, we review DIY Walk-in Closet Makeover in Part 2. You can easily jump between all parts of the project here:
- Master Bedroom Retreat, Overview: Before & After
- Master Bedroom Retreat, Part 1: DIY Painting Walls
- Master Bedroom Retreat, Part 2: DIY Walk-in Closet Makeover [Video] – you’re reading it!
- Master Bedroom Retreat, Part 3: Furnishings, Decor & DIY Painting Dresser, Side Tables
- Master Bedroom Retreat, Part 4: DIY Wood Planked Accent Wall
- Master Bedroom Retreat, Part 5: DIY Upcycled Mantel Headboard
- Master Bedroom Retreat, Part 6: DIY Tufted Headboard & Accent Pillows
- Master Bedroom Retreat, Part 7: DIY Bathroom Makeover on a Budget
Let’s Get Started with the Walk-in Closet Makeover
Eric and I set out on October 5th, for what I thought was going to be a “one to two week project” and turned into so much more…
With us moving in together next year and with an upcoming wedding, Eric saw it high time to renovate his master bedroom closet to utilize maximum space and accommodate two people. Having purchased his our home new in 2007, he has slowly been setting out to make things his in the house and upgrade the “contractor grade” construction materials most folks end up with in a new place.
We’ve summed it up in both a video tour and also in text below.
 To save money and have that accomplished feeling, we decided fairly early on to tackle the project ourselves.
Demolition
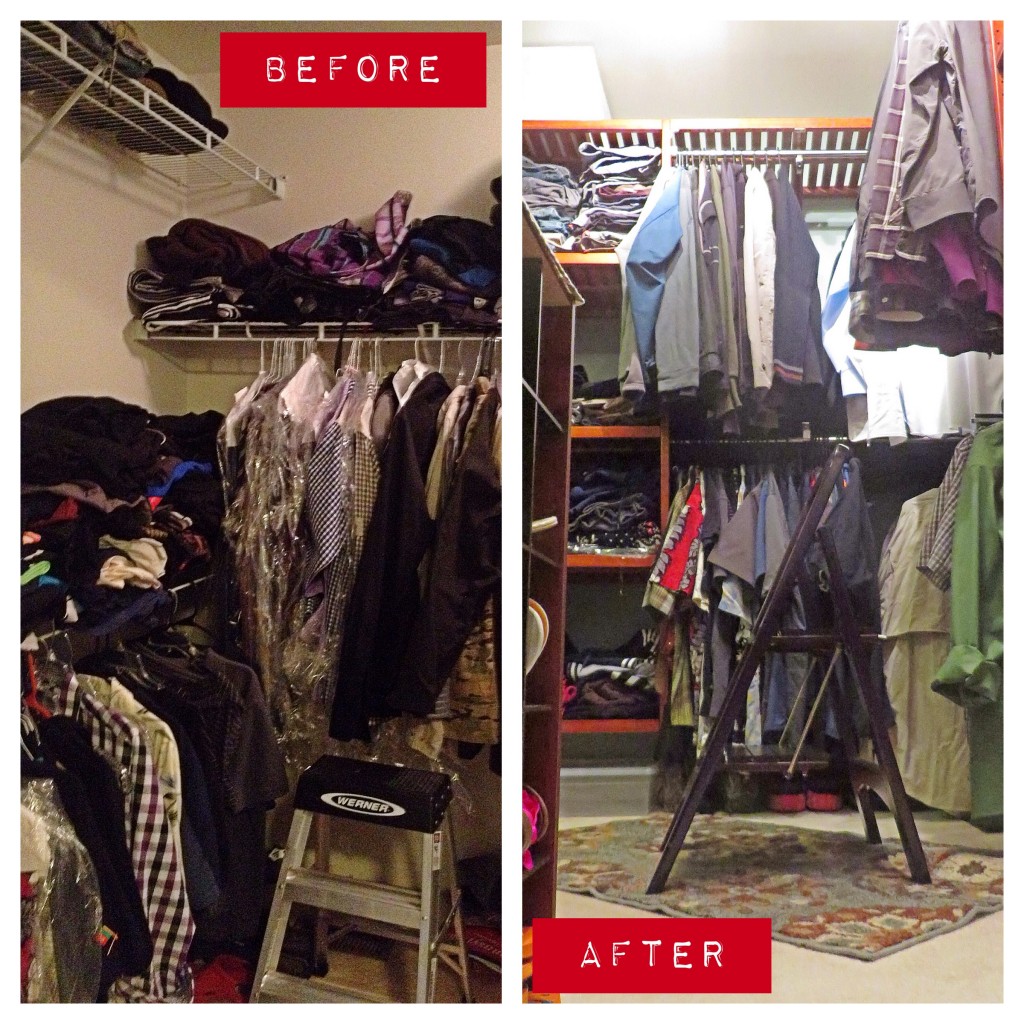
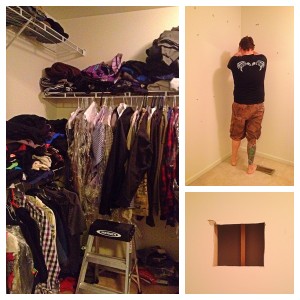
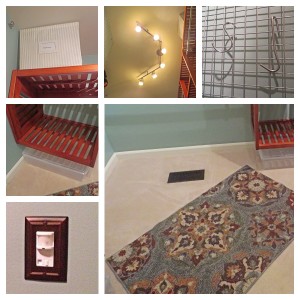
 After discussing our ideas for a few weeks, a couple rounds of purging on his part, and looking through some Pinterest boards for color ideas, we removed all of his clothing and linens from the closet on Saturday, October 5. After these items were removed, we (as carefully as possible) took down the Rubbermaid-style, white wire shelving lining 3 walls of the closet. This was attached in a way, that some areas were left with damage in the drywall and required some serious patch work. A couple of days of spackling, sanding, and oh, let’s not forget that in the process, Eric created a small hole in a set-back wall to see what was behind it.
Leaving No Space Untouched
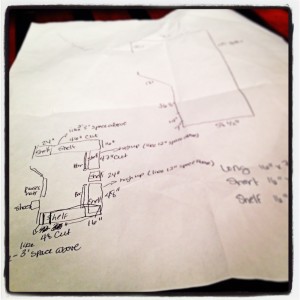
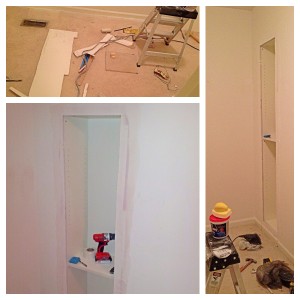 This wall he was opening up is the one immediately inside the closet door to the right and was clearly not the same wall in the bedroom. There was about 12″ or so of space between the two walls. Well, he expanded the hole to discover there was about 20-24″ of space in the middle, between some ventilation, where we could put a recessed shelf. To save the time and hassle from constructing our own shelf unit from scratch, we picked up a small 17″-wide BILLY shelf at IKEA. I built it, Eric stayed up late one night, setting it back into the wall, relocating some studs for structure, and patching up the hole he created to set it back.
Prep Work is Foundation
Once the spackling and dusting was done, and this took days, the room was ready for painting. Remember how I said we had looked on Pinterest boards for ideas? Well our color idea ultimately came from the master bedroom photo that we both liked and therefore was a natural selection for the closet color. (Ladies, I “pinned” a slew of photos into a Bedroom Looks pinboard and then one night, we went through the photos together. This ensured anything in the folder was something that I already liked and then when he said “I like this look” we kept all those photos in a separate pool knowing that WE BOTH liked, and then narrowed it down to one).
A Shiny New Coat
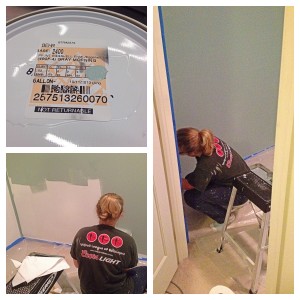 So, I handled the painting. Brought a bunch of supplies over from my home to save some money. We bought Gray Morning (490F-4) Behr paint after narrowing it down to that and a similar color, Smokey Slate (460E-3). Both of these colors had the green-blue-gray, midtone look we were going for in a gender-neutral couple’s room. We’re both fans of Behr paint from previous use and reviews in Consumer Reports and it’s about the only thing you’ll ever find either of us in Home Depot for. And, I’m a big believer in still doing a separate coat of primer and not buying the all-in-one. So, one day of primer, two coats of color, and whala, a brand spanking new room with a fresh coat of color.
Shelve It
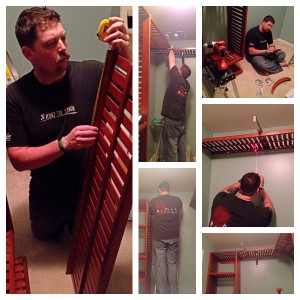
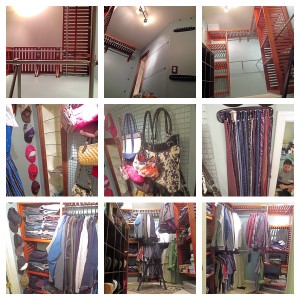
 Next, it was picking out our shelving and clothing rod materials. We looked at IKEA, and while impressive, their systems to look really good would need a lot of space and were not practical for our needs. We looked at Home Depot, and though we loved that the Martha Stewart line had a corner vertical shelf piece, we did not like how “cheap” the materials looked. We settled on the allen+roth brand at Lowes. It comes in a white, medium brown, and dark brown color. We went for the medium brown, which we thought would compliment nicely with our wall color.
The allen+roth brand is nice looking wood and a brushed nickel finish. It also allows for some customization on the vertical shelves, if you want to add drawers instead of shelves.
Then, it was onto planning out the shelving. We each wanted a vertical shelf and as much clothing rod space as possible, so we thought double-stacking in most of the closet would be smartest. In one area, it will be tall for dresses and longer items to be hung.
It was less expensive to buy four 96” rods and cut them down to size with a hacksaw, than it would have been to buy the 48” we needed and cut the other sizes down. Allen+roth assumes you are only going to be hanging the rods underneath shelves they make and they are either in 48” or 96” versions. No customization for real-world sized closets.
Some Con’s to Allen+Roth Organization Products
 Unfortunately, the allen+roth brand does not accommodate corners really well (the shelves do, but there’s no clear way to handle a corner with rods), and they don’t make an easy way to install lower rods without having to do a shelf above them. We don’t need a shelf there, since clothes will be hanging above it and will be utilizing that space where a shelf may come in handy for some. And, don’t use the stud/drywall anchors that are provided. Instead you’ll want to buy a box of E-Z Anchor self-drilling: 79lb-rated Twist and Lock drywall anchors (for straight drywall, Lowes #71537), 50lb-rated (and higher when in the stud) Stud Solver anchors (for studs, Lowes #169762), and 100lb-rated Toggle Lock (for straight drywall, heavy items, Lowes #68734). For the lower rods, we secured them to the wall with two parts we found on Amazon: rod brackets and rod flanges.
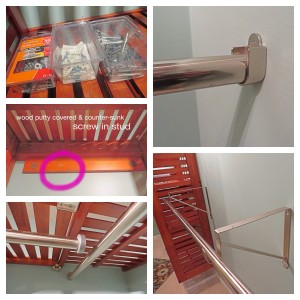 We also had to buy the Rubbermaid brand of rod end caps, since the allen+roth brand assumes that all poles will either run to walls or vertical shelves and therefore not allow hangers and clothes to fall off the end. Rubbermaid makes an end cap (Lowes #246448) that is plastic gray and looks brushed nickel from a distance.
Most of the pieces, and especially the full closet kit, are not really suitable to a custom-sized closet. You will need to be prepared to resize the items (shelves and rods).
We were also a little disappointed initially to find out that the vertical shelf pedestal base was only available for the dark brown line and not the medium color we had selected. But, without the pedestal base installed, we were able to use the space created underneath the shelf for even more storage.
Raising the Bar
Because we knew we were double-stacking the rods and clothing, we knew the top rod would have to start up fairly high. We installed the first vertical shelf unit, the one that went up against a wall then leveled out from there with a laser-level, the entire rest of the installation. It took about 3-4 days of spare time. The first vertical shelf took the longest, and we learned that allen+roth assumes you will have two studs to go into, and because our location on the wall did not match up with that, we installed four 100lb-rated drywall anchors, and then also backed that up with screws straight into the area we knew a stud fell. We filled that in with wood putty and used a furniture marker to fill that in, so no one would notice. Another night, we installed the other vertical shelf. A third night, the horizontal shelving that did not need customization (only two pieces). And, finally on the fourth night of install, the two shelves that needed a little trimming.
Operation: Maximus Spacious
 We made sure that all the curved shelf supports did go into studs (and used anchors whenever we could) and then went into drywall (also with anchors) anywhere we needed to. We over-engineered this baby. All-in-all, we were left with 9″ of room under the two vertical shelves (the Boot Box at The Container Store fit nicely). And, 10″ of space was left above the entire installation (the 9.75″ tall open-top bins with labels that Bed, Bath, & Beyond sells fit well — and each with a 20% off coupon brings them down to about $8 ea.)
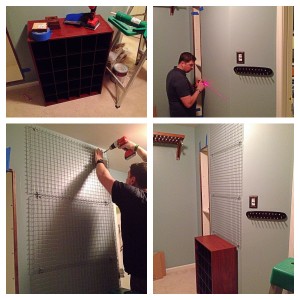
On our trip to The Container Store, we found a grid system (link removed as item no longer available) that would work well for the “purse wall” I was envisioning. But, first, I bought and built a 25 shoe rack on clearance at Lowes to sit on the floor of that space. That allowed us to measure up from there to install three of the grids horizontally to take advantage of the space. We got S hooks on Amazon to allow for purses (with wide handles), hats, etc. to be hung here.
Finishing Touches
 We swapped out the light switch cover to be consistent with others Eric had already put throughout the house, and it seemed to blend with the color scheme we had going so far. Above and below this, in the 16” of angled wall, we installed two medium wood colored tie/belt racks.
Then, to finish off the front of the shelf that we had earlier set back into the dead-space wall, we stained some trim and cut to size and glued to the wall with Liquid Nails.
To brighten the space, we purchased a 6-bulb track ceiling light at Lowes (allen+roth, Lowes #1157844) and swapped out the original single-bulb contractor-grade light.
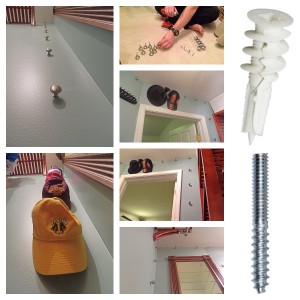 Last, but not least, we had some wall space left above the belt/tie racks, the doorway, and in two vertical areas of the closet as well. Here, we decided to utilize the space for our many baseball and other assorted hats by screwing standard kitchen cabinet door knobs into the wall. Well, these knobs are generally made assuming you’ll be holding the screw on the inside of the cabinet door and screwing the knob on from the outside, however we were going into drywall with no way to reach the backside. So, we bought hanger bolts (Lowes #124038, basically screws with no head; make sure to buy the appropriate size to match your drawer pulls / knobs – generally size #8-32) and screwed the knobs onto them. And, because you can’t just put a screw into drywall, or it would pull right out, we put one of the plastic drywall anchors (that the screws can break through with a manual hand-crank) into the wall for each screw and then manually screwed each knob into each anchor. Took a little bit of time, but looked really nice in the end. We spaced these about 8” apart horizontally and 12” apart vertically.
In the End
 It took 35 days of spare time, mostly two sets of hands on deck, considering all else we have going on in life. We sat there for about an hour when it was done staring at our work in amazement and our appreciation that we had done this masterpiece ourselves. No contractor would have ever got it just the way we envisioned it without charging us a pretty penny.
We thought the project would only take a week or two. We were wrong. Double it, and double it again.
We then started loading stuff back in. Everything is working just perfectly.
Now to determine which house project to tackle next. 🙂
Approximate Costs
750 Shelving + Rods + Hardware
130 Ceiling Light
100 Recessed Shelf + Glass Shelves
50 Recessed Shelf Trim
100 Paint + Stains + Supplies
100 Twelve Upper Shelf Bins
80 Wire Rack + “S” Hooks for Purses
40 Tie + Belt Storage
40 Shoe Caddy
20 Boot Boxes at The Container Store
50 Knobs + Hardware for Hats
40 Rug + Floor Vent Cover
40 Step Stool
50 Wall Anchors
30 Accessories
—–
$1,620 TOTAL PROJECT
(I really don’t even want to think about what a contractor might have charged us).
Next up: Master Bedroom Retreat, Part 3: Furnishings, Decor & DIY Painting Dresser, Side Tables – bargain hunting and sprucing up pre-owned furniture.
Related:
- Amy’s “Bedroom Looks” pinboard on Pinterest
- Station North Tool Library (It’s just like a book library, but with tools!) — in case you were wondering about Eric’s SNTL shirt 😉
The closet is the master bedroom walk-in closet in the Halifax Model of Ryan Homes builder/construction in Central Maryland.
Saving Amy is a participant in the Amazon Services LLC Associates Program, an affiliate advertising program designed to provide a means for sites to earn advertising fees by advertising and linking to amazon.com.